Monday, 30 November 2015

Starting my Animation: Test Scenes

Week 9

This week I shot my first scene animation scene as a test of animation and rendering. The classic 'Star Destroyer flying over the camera' shot as a test scene. With this scene I played with skyboxes and different colored lights, using blue tinted targeted point lights to replicate the 'aura' the engines of the huge cruiser would give off.

(Textures turned off to show the lights)


The background I used was just a simple generic 'Space' texture wrapped around a huge sphere with the Venator placed inside. Also inside is a Planet to give some background to the entire scene, although in the shot of the cruiser flying over you can't see it. I shot another test scene where I made the planet rotate and the cruiser float idly in orbit.

Yes, I know a planet wouldn't rotate in this manner, it was mainly to exentiate the two objects moving in unison. After now having a good play with different techniques and getting to grips on how to animate, I feel i am ready to now start shooting scenes for my animation.


Wednesday, 18 November 2015

Texturing: The Basics and Basic Keyframing

Week 8

This week I got to finally start texturing my finished models (something I've been looking forward too for a while now!) and jumped right in by Photoshopping some pictures of a Venator to use as my main body texture as all the lines and indents on the body are going to be detailed through the textures, as it is far too complex for me to model. Not to mention time consuming! I then created a Normal Map from this usign a website called NormalMap-Online and applied it to my model, adding the bump effect to try and give that little extra depth and detail to the texture.

I created a few more textures, the red for the main strips of colour of the ship and a alternative basic metal colour.  Below is my Work In Progress so far, the back and the smaller details haven't been textured yet.


The next thing I started toying with was 3DS Max's keyframing system, to make my Venator move slowly back and forth, in the lectres Steve has covered Cameras and in the practical Mario showed us a neat little technique in how to make an object follow the path of a Spline. The latter seems like it could be extremely useful in making the final animation look good, and I will start toying with more animation methods and techniques after the Venator is finally finished.

Storyboard update: I have started and nearly finished my revised storyboard for my animation. I will post it when it is all finished, with a closer explanation of each frame and my ideas that I plan to (hopefully implement). So far I am LOVING this project and enjoying learning all of the cool things 3DSMax can do.

Sunday, 15 November 2015

RE: Storyboard

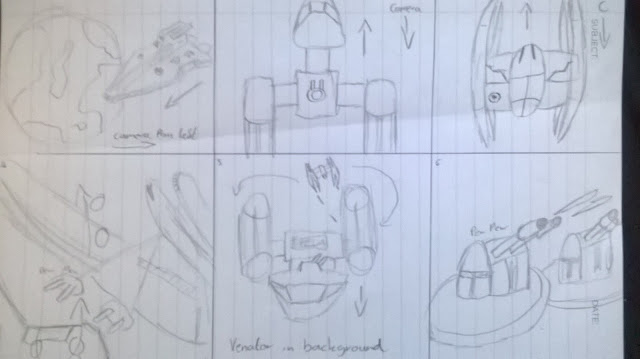
For some reason my storyboard post has not been uploaded/displaying correctly for whatever reason.Upon realising this, here is a quick re-upload of my storyboard. As you can see in the storyboard I drew a Vulture Droid which is no longer one of the models I am making (replaced by the Imperial TIE Fighter.) I will re-draw the storyboard with the TIE Fighter instead of the Vulture droid, and more than likely change some of the aspects of the planned animation too. I will post the updated storyboard with descriptive text soon.

Tuesday, 10 November 2015

Greeble Tool and Final Touch Ups

Week 6

This week in the practical Mario came over and had a quick look at my models and happily seemed quite impressed with the work I had produced (especially my Y-Wing) and offered me a few very helpful tips in which to improve my work further from mainly a technical 'nit picky' way.

I was playing with textures on my TIE Fighter when Mario suggested I look at the bump map texture shader. A shader which creates the illusion of detail and depth by tweaking the aspects of the texture map applied to it. I guess this is done by darkening the parts of the texture that are dark to begin with, to create a visual feeling of depth.

The next little tool (and by far my favourite) was a 3rd party plugin for Max called 'Greeble'. This excellent little tool uses a seed system to generate a bunch of module like blocks on the currently selected face/object and is just perfect for creating all the little details along the side of my Venator cruiser as it replicates perfectly what the modules along the side would look like. Also very effective for Death Stars and Star Destroyers might I add!


Finally Mario suggested that I do abit of clean up on some of the finer details of my models such as my Y-Wing, as where I have used the boolean tool to cut out shapes and details, Max has filled in with unnecessary lines and edges. This creates more polys and by removing them, although no change can be seen visually, technically it makes my model much more efficiently designed and lows the poly count, which in turn would make it alot more friendly to use in games, Below you can see a before and after shot of a section of my Y-Wing after I had cleaned the edges. If you can't see the lines, just take note of the poly count in the top right. I did this by simply selecting the lines I wanted to remove, and then clicking the Remove button in the modifier tab! Simples!


Before


After

Saturday, 7 November 2015

The TIE Fighter

Week 6

As mentioned before changed my choice of a Vulture Droid Starfighter to a Imperial TIE Fighter. I did this because alot of the images I found of the Vulture Droid were either simple, too samey angles or useless photos of legos models.

While moddeling the TIE Fighter I actually made around 3 versions. The 3rd being my final model in which I used the 2nd version as a template and made small adjustments to things like sizes and detailing which actually look alot better.

Version 2


I felt overall I had successfully done good overall model, at least to use as a basis for a better, more detailed model. This versions proportions and sizes are slightly incorrect though, evidenced mainly by the cockpit window being smaller than it should be, The struts on the sides of the wings are also quite messy and don't really represent the struts accurately. Its also worth noting that even though TIE blueprints are easy to obtain, I ended up doing this entire model by eye without even realising.

Version 3 (Final)


For the final version I added alot more detail onto the body and fixed how the struts were. Instead of using just one shape I used two blocks for each strut and pulled them through the wing to save on polys. I cut in some vents using the Boolean tool on the wings to add more depth to the outer connectors.

Adding panels and details to the body was challenging due to the spherical angles. I found that pulling out a polygon and then extruding it would create a shape exactly on the angle of the body. I used this methods to make the various panels around the body.

Side Note: I was playing Star Wars Battlefront 2 recently and was flying around the in game Venator Cruiser model and comparing it to my own. I was pleasantly surprised to discover my Venator model is more detailed than the one used in game. All their detail was done using textures, while some of mine are actually 3D objects. It also has 10k polygons... But principle right?

Thursday, 5 November 2015

Week 6 - Finished Models

This week I finished my final Venator model as pictured below. This is by far the model I have spent the most time and effort on, and was the one I finished first. The sheer size and scale means there was alot of detail I could have kept adding and adding, but I felt like if I carried on adding more detail to this, I would never get round to finishing my other models.

The final model has around 10,000 polygons even despite me doing my best to try and keep it as low as possible. I think the main cause of this is the detail I put into the engines as there are 6 in total, with bevelled and extruding cylinders. Another cylinder based object that is quite prominent on the ship are the turrets. With 10 in total, I think i made the bodies of the turrets have way too many sides for what they needed.

In conclusion I am very proud of this model, considering it is my 'first attempt' at making a finished 3D model and accurately recreating one of my favourite ships from the Star Wars universe.

The next model I finished this week was my Y-Wing fighter. I choose this for two reasons. 1. Because everyone does X-Wings and I wanted to do something different. 2. I felt the relatively simple shape of the ship would be easier to reproduce and add detail too.
The problem I got with this that all the reference images for the ship are very inconsistent. With versions of the ships missing parts, being a ever so slightly different model with detail changes, engine sizes etc making it hard to find just one set of images to work from. So I adapted my design slightly and opted to go for a more 'fresh out of the factory' look, over the tatty and battered Rebel Alliance versions. This would help minimize surface detail and inconsistency. 
In the end I feel that the Y-Wing came out alot better than I expected, especially if you compare my Version 2 with this. 


All that is left to do is my 3rd ship and after trying to find some decent reference images for a Vulture Droid starfighter, I couldn't most o them being useless lego images. So I have decided to change my 3rd ship to a generic TIE Fighter as they have plenty of images and should be easier to make a better model from.

Wednesday, 4 November 2015

Connor Gambles Blog Review

Connors blog is great at describing what he is currently working on, and the processes he uses to improve his models. These describtions are always accompanied by clear images showing the design process.

Each post has the title of the week it was posted (Along with the time stamp) which when you scroll through the entire blog, shows how he has improved week after week when you compare earlier versions of models to the newer ones.

I think some improvements that could be made is thta the pictures of the models he has created could be bigger, and have more variation in the angles, allowing us to see the entire model and if he does any detail, a close up of it.

All in all a very good blog which shows a clear process of design and improvement in using the software.

Link to blog - http://arusstarwarsmodellingproject.blogspot.co.uk/search?updated-min=2015-01-01T00:00:00Z&updated-max=2016-01-01T00:00:00Z&max-results=5